In the last post of this series on learning CUDA through building a gravity simulation, we didn't actually do any CUDA. We focused on defining gravity and figuring out how we were going to actually simulate it with practical equations. Now it's time to put those equations to work and see if we can come up with a functioning simulation that uses CUDA. We'll start with the simple 2-body problem of the Earth orbiting around the Sun, and see if we can keep the Earth in orbit.

The Kernel
Remember, the part of the code that executes on the GPU is the kernel. We're going to start with designing the kernel because I want to get the gravity equations down in code in order to get a handle on which vectors we're going to need to supply to the kernel from the host CPU. We'll build up the rest of the simulation from that kernel, and then we can see how it works.
First, we need to think about how this kernel is going to be used during execution. Each thread running on the GPU will execute its own instance of the kernel. We will have n bodies in this simulation, and each body will need to examine every other body to calculate their contribution to the total gravitational force felt by the first body. Said another way, if we have bodies b1, ..., bn, then we calculate the total force on body b1 from the contributions of the forces from bodies b2, ..., bn. It may seem from this O(n2) problem that we could gain something by parallelizing every individual body-body calculation, but if n is on the order of the number of cores in the GPU, then we've really gained nothing but difficulty in designing the calculations in the kernel because we're going to have to do n iterations anyway. The iterations are just no longer in a simple inner loop in the thread of one body calculation. We may even suffer a slowdown from too much extra control code to manage everything. It'll be simpler and likely sufficient to have the kernel do the whole calculation for one body, and the simulation will be O(n) as long as n is on the order of the number of cores in the GPU.
With that consideration out of the way, we'll start with the gravitational constant, and a simple data structure to hold a 2D point:
#include "cuda_runtime.h"
#include "device_launch_parameters.h"

#include <stdio.h>

#define G 6.674e-11

typedef struct vec2d {
    float x;
    float y;
} vec2d;Next, for the kernel definition we're going to need the mass and current position of each body, the current velocity of the body we're calculating, and we'll output the new position and velocity of that body. All of these variables are passed to the kernel as arrays of data for all bodies because all of the data is loaded into the GPU memory at once, and each thread instance will access the elements that it needs to. The start of the kernel then looks like this:
__global__ void gravityKernel(vec2d* v, vec2d* d, const float *m, const vec2d* v0, const vec2d* d0, float dt)
{
    int i = threadIdx.x;
    const vec2d d0_i = d0[i];
vec2d a = { 0, 0 }; for (int j = 0; j < blockDim.x; j++) {
if (j == i) continue;
const vec2d d0_j = d0[j];
vec2d r_ij;
r_ij.x = d0_i.x - d0_j.x;
r_ij.y = d0_i.y - d0_j.y;
float r_squared = r_ij.x * r_ij.x + r_ij.y * r_ij.y;
float F_coef = -G * m[i] * m[j] / r_squared;
vec2d F_ij;
F_ij.x = F_coef * r_ij.x * rsqrtf(r_squared);
F_ij.y = F_coef * r_ij.y * rsqrtf(r_squared);
a.x += F_ij.x / m[i];
a.y += F_ij.y / m[i];
}
F = ma
First, we calculate the rij vector for the distance from body j to body i (the direction is important), and then just churn through the rest of the equations. The rsqrtf() function calculates 1 / sqrtf(), which is faster to do as the reciprocal and then multiply instead of doing the divide by the square root directly. Note that we multiply by m[i] to calculate F_coef, and then we divide by the same m[i] later to calculate the acceleration vector to add, so we can remove those operations and accumulate the acceleration vectors more directly:
    for (int j = 0; j < blockDim.x; j++) {
        if (j == i) continue;

        const vec2d d0_j = d0[j];
        vec2d r_ij;
        r_ij.x = d0_i.x - d0_j.x;
        r_ij.y = d0_i.y - d0_j.y;

        float r_squared = r_ij.x * r_ij.x + r_ij.y * r_ij.y;

        float F_coef = -G * m[j] / r_squared;
        a.x += F_coef * r_ij.x * rsqrtf(r_squared);
        a.y += F_coef * r_ij.y * rsqrtf(r_squared);
    }
    const vec2d v0_i = v0[i];
    v[i].x = v0_i.x + a.x * dt;
    v[i].y = v0_i.y + a.y * dt;

    d[i].x = d0_i.x + v0_i.x * dt + a.x * dt * dt / 2;
    d[i].y = d0_i.y + v0_i.y * dt + a.y * dt * dt / 2;
}
Calling the Kernel
On the next level up in the code, we need to call the kernel from the host CPU. We'll use a helper function to call the kernel and read the newly computed position vector out of the GPU memory:
cudaError_t gravityIter(vec2d* d, vec2d* dev_v, vec2d* dev_d, const float* dev_m, const vec2d* dev_v0, const vec2d* dev_d0, float dt, unsigned int size)
{
    cudaError_t cudaStatus;

    // Launch a kernel on the GPU with one thread for each body.
    gravityKernel <<< 1, size >>> (dev_v, dev_d, dev_m, dev_v0, dev_d0, dt);

    // Check for any errors launching the kernel
    cudaStatus = cudaGetLastError();
    if (cudaStatus != cudaSuccess) {
        fprintf(stderr, "addKernel launch failed: %s\n", cudaGetErrorString(cudaStatus));
        return cudaStatus;
    }

    // cudaDeviceSynchronize waits for the kernel to finish
    cudaStatus = cudaDeviceSynchronize();

    // Copy output vector from GPU buffer to host memory.
    cudaStatus = cudaMemcpy(d, dev_d, size * sizeof(vec2d), cudaMemcpyDeviceToHost);

    return cudaStatus;
}I showed one example of the error checking code for cudaGetLastError() to give a sense of what basic error checking looks like, but I left out the rest for conciseness. Basically anywhere that cudaStatus is set would have similar error handling. It's useful for debugging if something goes wrong, but uninteresting otherwise. On the next level up, we want to call this gravityIter() function from a loop that will step the gravity simulation. Here's what that looks like:
cudaError_t gravitySim(vec2d* d, const float* m, const vec2d* v0, const vec2d* d0, const float dt, unsigned int size, unsigned int iterations)
{
    float* dev_m = 0;
    vec2d* dev_v0 = 0;
    vec2d* dev_d0 = 0;
    vec2d* dev_d = 0;
    vec2d* dev_v = 0;
    cudaError_t cudaStatus;

    // Choose which GPU to run on, change this on a multi-GPU system.
    cudaStatus = cudaSetDevice(0);
    if (cudaStatus != cudaSuccess) {
        fprintf(stderr, "cudaSetDevice failed!  Do you have a CUDA-capable GPU installed?");
        goto Error;
    }

    // Allocate GPU buffers for five vectors (three input, two output)    .
    cudaStatus = cudaMalloc((void**)&dev_d, size * sizeof(vec2d));
    cudaStatus = cudaMalloc((void**)&dev_v, size * sizeof(vec2d));
    cudaStatus = cudaMalloc((void**)&dev_m, size * sizeof(float));
    cudaStatus = cudaMalloc((void**)&dev_v0, size * sizeof(vec2d));
    cudaStatus = cudaMalloc((void**)&dev_d0, size * sizeof(vec2d));

    // Copy input vectors from host memory to GPU buffers.
    cudaStatus = cudaMemcpy(dev_m, m, size * sizeof(float), cudaMemcpyHostToDevice);
    cudaStatus = cudaMemcpy(dev_v0, v0, size * sizeof(vec2d), cudaMemcpyHostToDevice);
    cudaStatus = cudaMemcpy(dev_d0, d0, size * sizeof(vec2d), cudaMemcpyHostToDevice);

    int time = 0;
    printf("Time,Object0.x,Object0.y,Object1.x,Object1.y\n");
    for (int i = 0; i < iterations; i++) {
        if (cudaSuccess != (cudaStatus = gravityIter(d, dev_v, dev_d, dev_m, dev_v0, dev_d0, dt, size))) {
            goto Error;
        }

        time += dt;
        printf("%d,%f,%f,%f,%f\n", time, d[0].x, d[0].y, d[1].x, d[1].y);

        if (cudaSuccess != (cudaStatus = gravityIter(d, dev_v0, dev_d0, dev_m, dev_v, dev_d, dt, size))) {
            goto Error;
        }

        time += dt;
        printf("%d,%f,%f,%f,%f\n", time, d[0].x, d[0].y, d[1].x, d[1].y);
    }

Error:
    cudaFree(dev_d);
    cudaFree(dev_v);
    cudaFree(dev_m);
    cudaFree(dev_v0);
    cudaFree(dev_d0);

    return cudaStatus;
}Now we're at the crux of the function—the iterations. The number of iterations is actually doubled in this for loop, and the reason to call gravityIter() twice in this way is that it makes it easy to ping-pong between the current and next velocity and position vectors. Notice that dev_v and dev_d are swapped with dev_v0 and dev_d0 between the two calls. This swap makes the previous call's new velocity and position vectors the next call's initial velocity and position vectors, and the other vectors can be used for the new new data that will be calculated. At the top of the next iteration, the variables get swapped again automatically. No temporary variables necessary!
The last thing I want to mention is the printf() statements. They're used to get the positions out to the debug console for, well, debugging purposes, and I can graph the data in a spreadsheet for an easy visual display. However, this method of getting data out of the program will not be sustainable because printing to the console in the middle of a simulation is very slow. We'll cook up something better in the future.
Initializing the Simulation
All that's left to do is initialize some variables in main() and call that last gravitySim() function. I saved the easiest for last:
int main()
{
    const int arraySize = 2;
    const float m[arraySize] = { 1, 2 };
    const vec2d d0[arraySize] = { {0, 0}, {1, 0} };
    const vec2d v0[arraySize] = { {0, 0}, {0, 1} };
    vec2d d[arraySize] = { {0, 0}, {0, 0} };
    const float dt = 1;
    const unsigned int iterations = 10;

    // Run gravity simulation.
    cudaError_t cudaStatus = gravitySim(d, m, v0, d0, dt, arraySize, iterations);
    if (cudaStatus != cudaSuccess) {
        fprintf(stderr, "gravitySim failed!");
        return 1;
    }

    // cudaDeviceReset must be called before exiting in order for profiling and
    // tracing tools such as Nsight and Visual Profiler to show complete traces.
    cudaStatus = cudaDeviceReset();
    if (cudaStatus != cudaSuccess) {
        fprintf(stderr, "cudaDeviceReset failed!");
        return 1;
    }

    return 0;
}

Cool beans, it worked! I bet you were surprised. Time to try something more ambitious.
Earth Orbiting the Sun
Let's try plugging in the values for the mass of the Sun and the Earth, the average distance of the Earth from the Sun in the x direction, and the average velocity of the Earth in the y direction (values found at Wikipedia):
    const float m[arraySize] = { 1.989e30, 5.972e24 };
    const vec2d d0[arraySize] = { {0, 0}, {1.496e11, 0} };
    const vec2d v0[arraySize] = { {0, 0}, {0, 2.978e4} };
    vec2d d[arraySize] = { {0, 0}, {0, 0} };
    const float dt = 86400;
    const unsigned int iterations = 183;

Well, um. That doesn't look quite right. I mean, the Earth is definitely going around the Sun, and the Sun is staying put in the center (at least at this scale). Yet, the Earth doesn't complete a full orbit in a year, and it kind of looks like it's going to spiral out from there. What's the problem? Well, it turns out that simulations that use differential equations are extremely dependent on the resolution of the time step, among other things. This happens to be a simulation of differential equations. You can tell by the dt variable. That delta-time is a dead giveaway that we're dealing with a difficult simulation problem.
We can increase the accuracy of the simulation by decreasing the time step. That means, instead of assuming that the Earth is going to maintain its calculated acceleration and velocity for a full day, we're going to narrow that timeframe to six hours—a quarter of a day. In reality, the Sun's gravity has a continuous effect on the Earth, and vice versa, so the acceleration and velocity are changing continuously, but I don't have all day to run this simulation. I just want to see if we can get an improvement. Here's the exact same simulation with a time step of 21,600 seconds and 732 (really 1464) iterations:
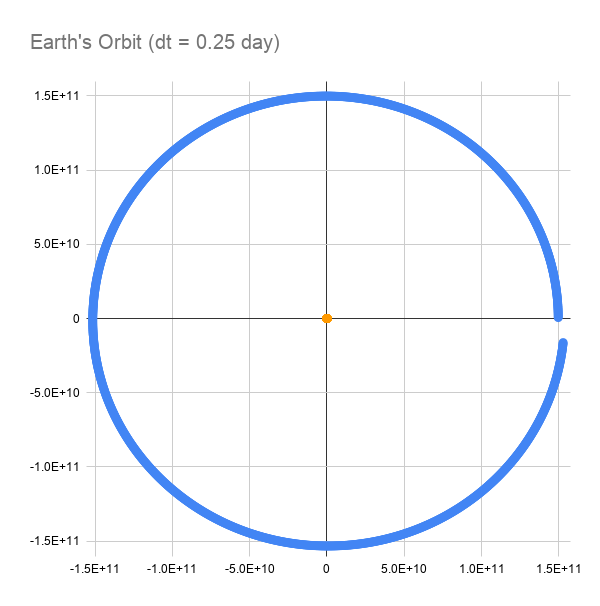
This is looking promising. We still don't complete a full orbit, but we're much closer. I'm sure dropping the time step to half an hour or ten minutes or something will get us close enough for practical purposes. What about that Sun-dot in the middle; what does that look like?

What the heck is that?! It looks like the Sun swings out 800,000 meters (800 km) and comes back 300 km "up" from where it started. I know the Earth exerts some pull on the Sun, along with all of the other planets, that causes it to wobble around, but I would expect it to look more like a circle. The issue here is likely initial conditions. The Sun shouldn't start motionless, and in fact, it should start with an initial velocity in the negative y direction, opposite the Earth's velocity. That should give this motion a more circular path. Another possible way to see that circular path is to extend the simulation for much longer. The Sun and the Earth should settle into a stable orbit with the Sun having a small circular wobble. This simulation shows another important point about these types of simulations, namely that the initial conditions matter–a lot. I know I've seen these things mentioned in books and on websites, but it really brings it home to see it in a simulation you've built yourself. Another thing that I expect has an effect, although smaller than the time step or initial conditions for this particular simulation, is the finite resolution of the 32-bit floats. The resolution of the data, and the rounding error of the calculations could be improved by using doubles, but the trade-off is a slower simulation. That resolution problem is going to have an effect at extremely long time scales, which is why it's so hard to simulate the solar system accurately out to more than a few thousand years. For our purposes, I'll stick with floats until it becomes obvious that we need the extra resolution.
This was all very exciting to get a simulation up and running on my graphics card using CUDA. I would like to explore this simulation of Earth's orbit some more, but it's tedious to keep exporting the data from the console to a spreadsheet and plotting it. Next time we'll look at plotting the simulation in realtime (or at least simtime) with a visual display. I mean, I'm already programming the graphics card, might as well use it for graphics, too. The visual display will also enable us to explore more complicated simulations in the future. Right now the simulation isn't quite right for more than two bodies, but that will come after we can see it on the screen.
No comments:
Post a Comment